
This is a build log of my PID modification to my DeLonghi EC155 espresso machine. Currently, the machine uses an Arduino to drive a solid-state relay controlling the heating coil. The Arduino displays mode and temperature on a serial lcd, and also dumps status information over the serial port.
Update 1: I’ve ordered parts for a permanent install on protoboard, after I finish the install, I’ll update this post with build instructions and details. I will also provide a link to a mouser project where you can order most of the parts in one place.
Update 3: Everything is assembled and functional, and I made an aluminum case thing for the LCD and rotary encoder. Photos to come soon. (8/25/10)
Update 4: ZonCoffee .2 is released! See the release page to download the sketch and to see additional hardware information. (1/4/11)
This post is one of a series of posts regarding mods I have done to my EC155
Required Parts:
- Thermocouple ($2, ebay)
- MAX6675 (maxim-ic) (now sold by sparkfun! 7/17/10)
- Arduino-bootloaded AVR of some sort ($30, sparkfun)
- Solid-State Relay 25A+ ($7, ebay)
- Switch (any type will do)
Optional Parts:
- Serial LCD ($25, sparkfun)
- OSRAM SLR/SLG/SLO 2206 LED Display (driver coming to ZonCoffee soon, will require shift register)
- Screw Shield ($10, sparkfun)
- Rotary Encoder
My build is currently on a Arduino board with a screw shield, but I’m planning on making a PCB soon. I’ll update this page with links where you can purchase the PCB (probably through batchPCB) in the near future.
Software:
- Modified BBCC code (arduino sketch)
- Modified MAX6675 library
- BBCC plotter (processing sketch) [link]
Construction:
- Installing the SSR and Thermocouple (coming soon)
- Connecting the electronics (coming soon)
- Editing and uploading the software (coming soon)
- Calibrating the thermocouple (coming soon)
Ethan is a computer engineer and open source hardware/software developer from Michigan. He enjoys AVR and linux development, photography, mountain biking, and drinking significant amounts of home-roasted coffee. Find out more at ethanzonca.com.
Hey there,
I stumbled across your blog doing some espresso related searches. Looking forward to hearing more about your project. I’m an espresso and Arduino fan as well!
Watch out for self heating effects on the 6675. I gave up on using this chip for a similar application because of the ~10C error that self heating produced.
I haven’t had much of an issue with self-heating (so far), but I have had some significant temperature fluctuations when slight voltage drops occur.
I’m curious as to where and how you decided to attach the thermocouple? I’m planning on upgrading my EC155 to PID soon.
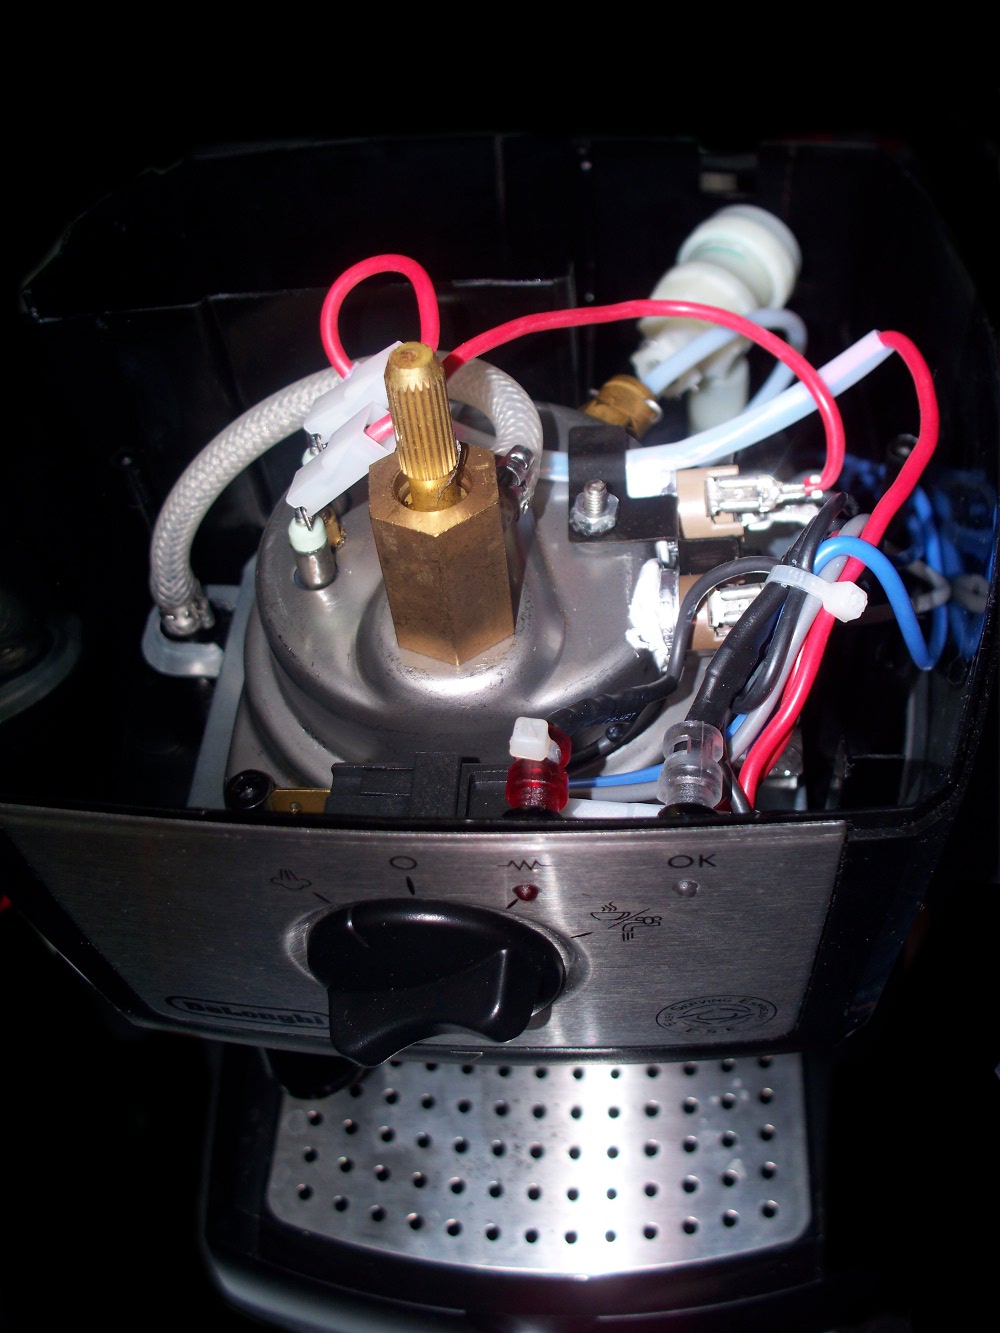
I stuck my thermocouple right under the existing thermal switch, which keeps it in constant contact with the boiler. It’s also nice that there is plenty of thermal paste already applied for good thermal conductivity. I have seen other designs where screw-on lugs were used, but it’s much easier to place it under the existing switch. Good luck!
looking forward to PCB
I have the same model. How do you take the cover off the machine? I’ve removed the screws on top but can’t get the cover off. I see there are two screws on the bottom – do they need to be removed too? I’d like to remove the plastic tamper. Thanks!
To take the cover off of the EC155, you do need to remove the 2 screws around the grouphead. You also need to pry off the steam knob as well; there are also 2 screws under the knob, but you do not need to remove them.
Hi, I’m just place an order for a EC155. Thanks for all the important info you guys posted.
Just wondering, is not easier to buy a PID from ebay? I found that there’s a lot of them for less than $40 including a thermocouple.
Any advantage using arduino?
Using an Arduino opens the door for a lot of customization, and you can have a pretty nice-looking display. If all you want is basic PID, the eBay PID modules would work well for you. I’m working on getting the cost of this system down too, just got some compact boards fabbed, using a parallel lcd, and the cost is getting closer to ~23 bucks components-only.
Hi there. I’m thinking of doing something similar with a Gaggia Classic. How do you go about inserting the thermocouple? Will it go under the existing screw for the brew thermostat?
Hi Ethan! Is this the most up-to-date information for this PID upgrade? I am very interested in implementing it.
Hi Ethan- cool mod. Would you mind contacting me about a question I have regarding wiring the PID to the machine? Thanks.
This is great! I want to add PID for mine, but I also want to be able to control the pump. So you have any information on the schematic of the machine itself. Thank you for this great content
I am making a PID controller using an Arduino for the same espresso machine. I was wondering what coefficients you used for P I and D. Also did you model your system theoretically and use a transfer function or did you just guess and check