

I recently purchased a used Gaggia Classic machine on Amazon. After realizing that it was not as “lightly used” as the seller denoted, I took apart the entire machine to clean it up. I’ve written this guide as a teardown guide, but feel free to read it from bottom-up to get a clear understanding of how to assemble this machine. Feel free to drop a comment if you have any questions or information to add.
Tools
Before you start out, I would recommend purchasing a few tools (most available at your local hardware store):
- Brass brush
- Metric allen wrench set
- Citric acid or espresso machine cleaner
- Phillips screwdrivers
- Pliers or a crescent wrench
Note: You can buy citric acid at many bulk food stores for a reasonable price
Remove the Boiler
Begin by removing the two attachment screws on the top of the machine by the water spout. The top plastic water spout / sheet metal assembly should pull off towards the back of the machine.
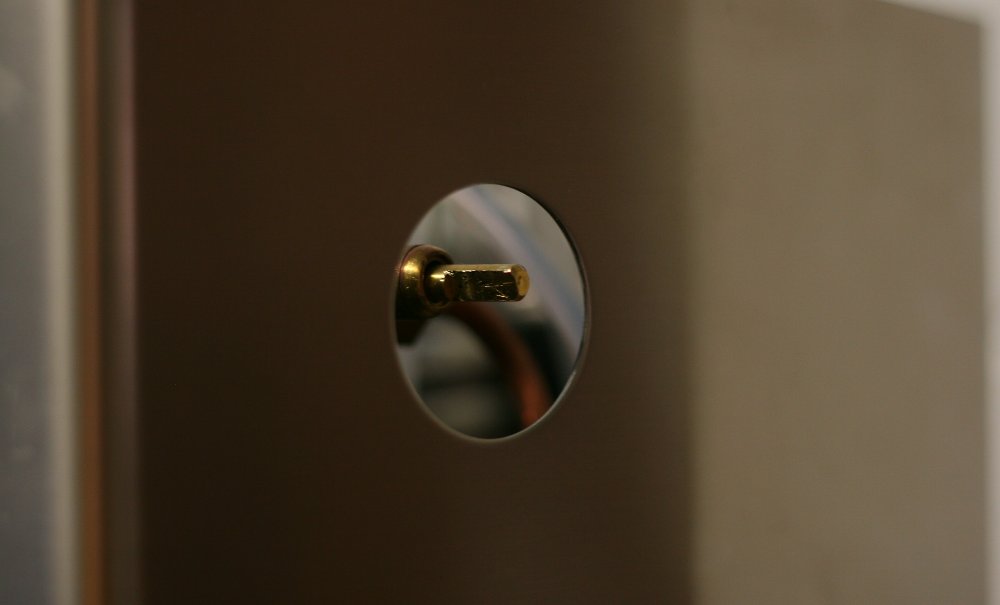
Next, pull the steam wand knob off (it might take a bit of effort). Note that the valve in the photo above is a bit offset, this is due to my machine being damaged. Yours should (hopefully) be centered in the hole. You’ll also want to pull the push-on connectors off of the power connector on the rear of the machine, and pull all the cables off of the front switch. I recommend numbering each of these connectors before pulling them off so you can easily reconnect them.

Flip the machine over and use allen wrenches to remove the four bolts attaching the group to the chassis.
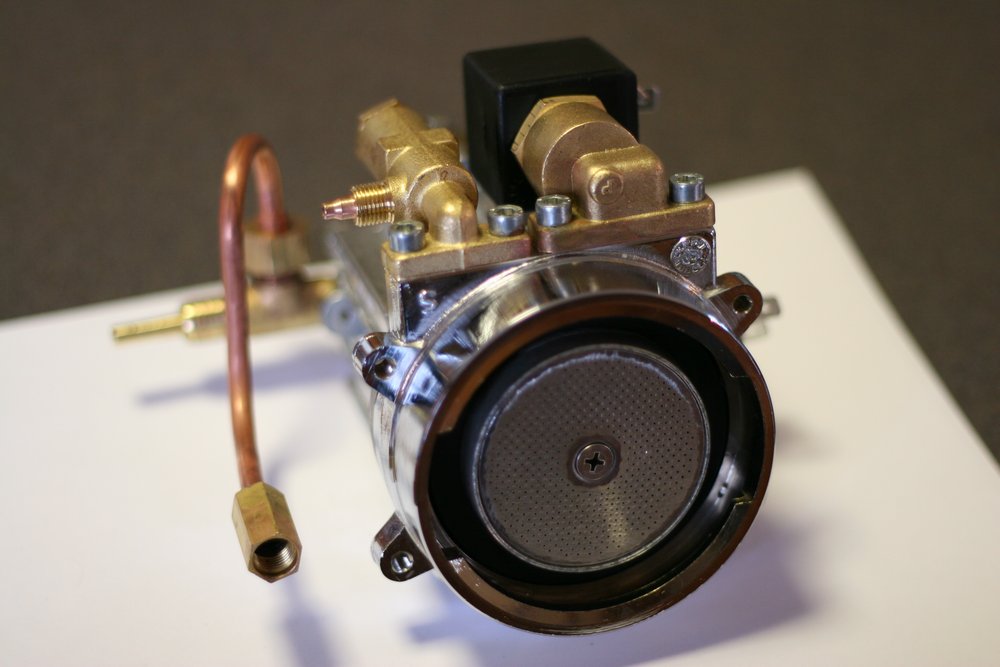
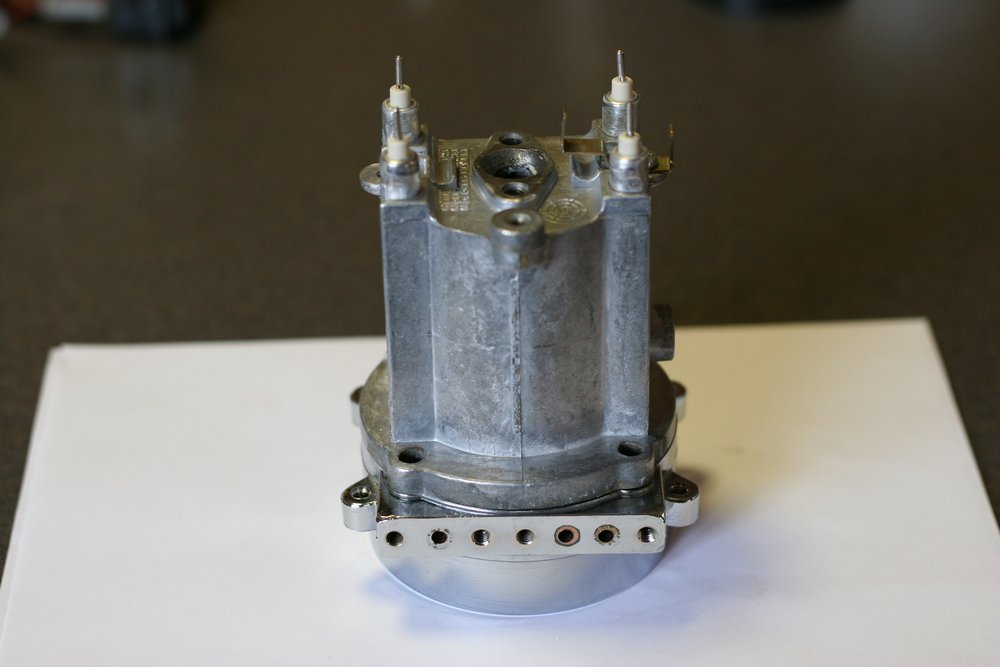
After removing these screws, your boiler should be free. Remove the boiler from the chassis and place it in a clean work area. Note that things might get messy and/or moist very soon.
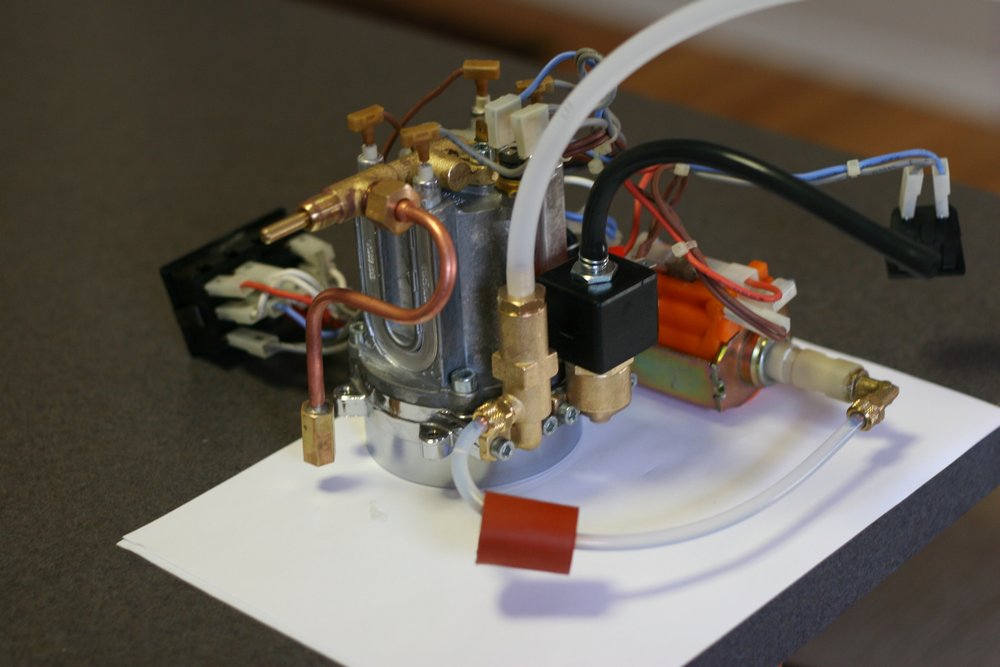
Using a standard or crescent wrench, remove the chromed steam wand from the copper steam pipe. This will allow you to set the group down on a flat surface without damaging the copper pipe.

Next, detach the electronics and pump from the machine. You will need to detach the pump hose from the OPV and unplug all push-on connectors. If you leave your wire assembly as-is after you unplug all connectors (don’t bend or crush the wires!) you should be able to easily see where all of the wires connected to for reassembly.
To make life easier, remove all hoses from the machine. You should only need to remove the 3-way solenoid hose and the OPV hose at this point.
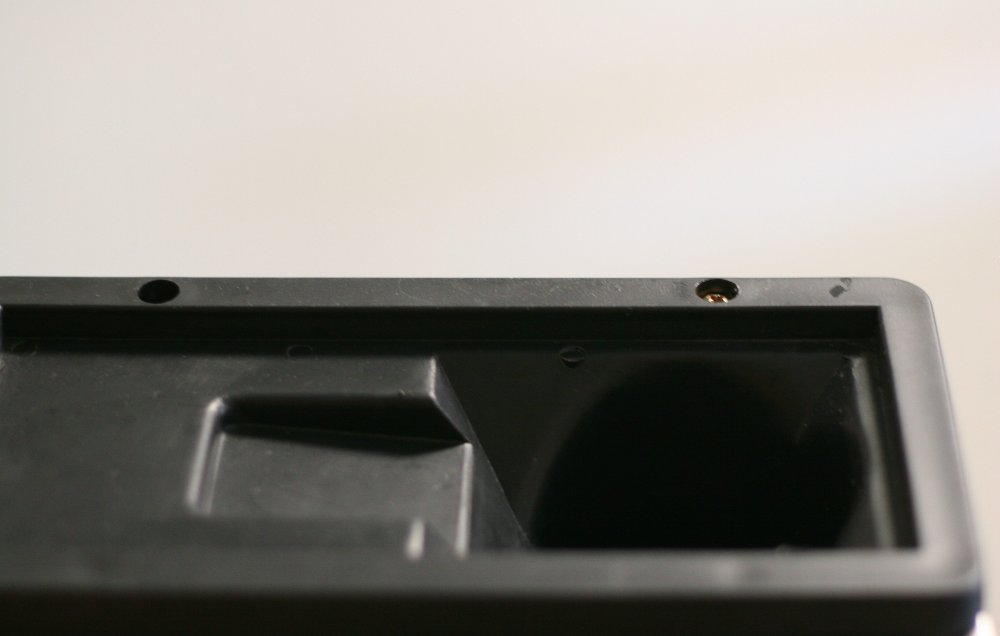
Now flip the boiler on its side. You’ll see a phillips screw head in the middle of the shower screen.
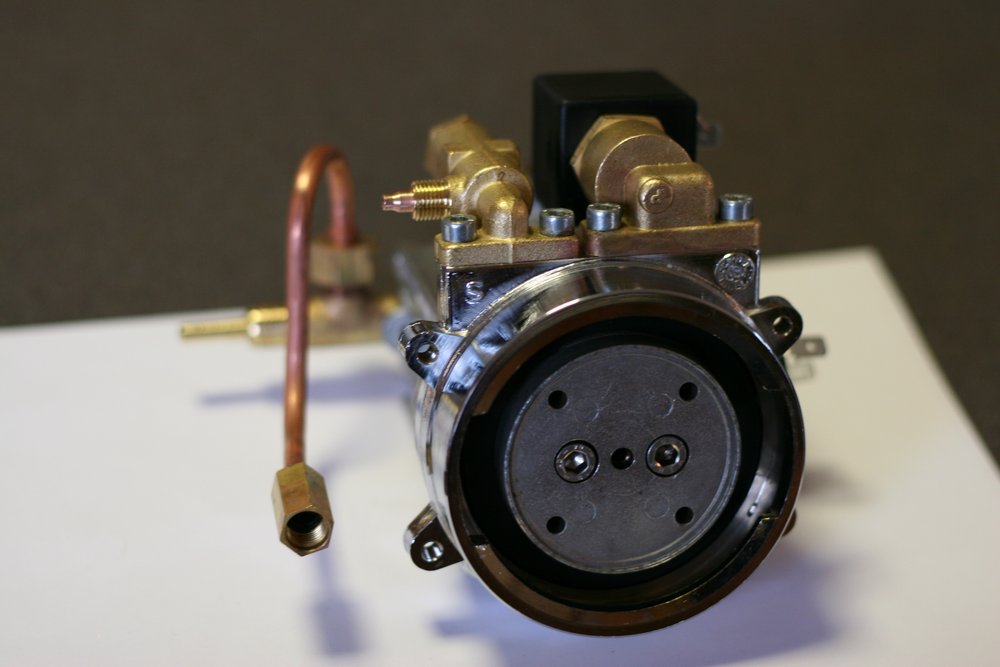
Remove the phillips screw from the shower screen, and then pull off the shower screen itself. If it is stuck due to calcification or coagulated coffee compounds, use a small flathead screwdriver to pry it off.
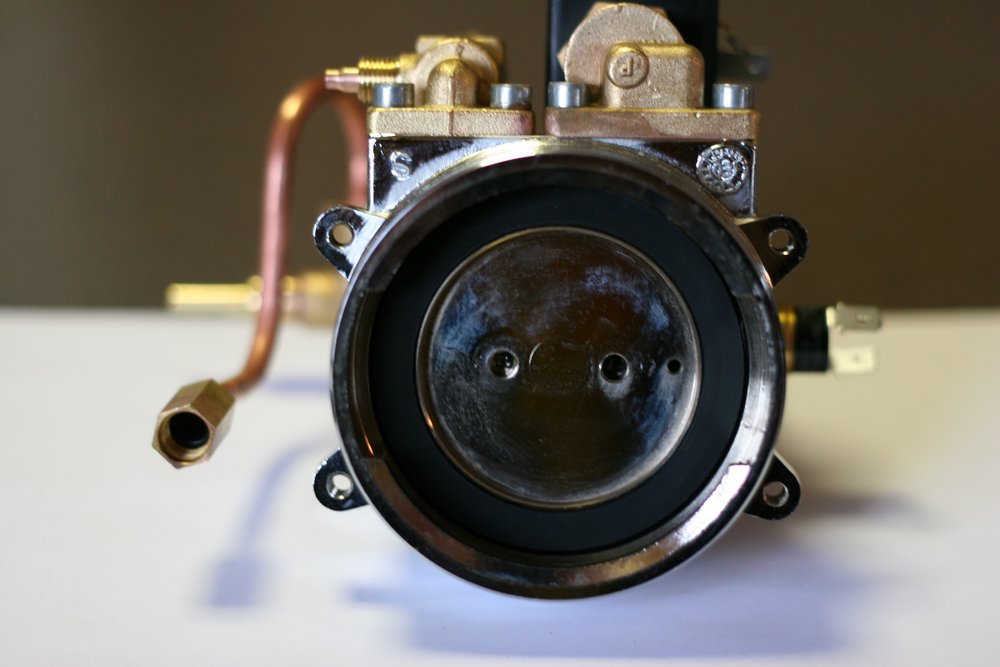
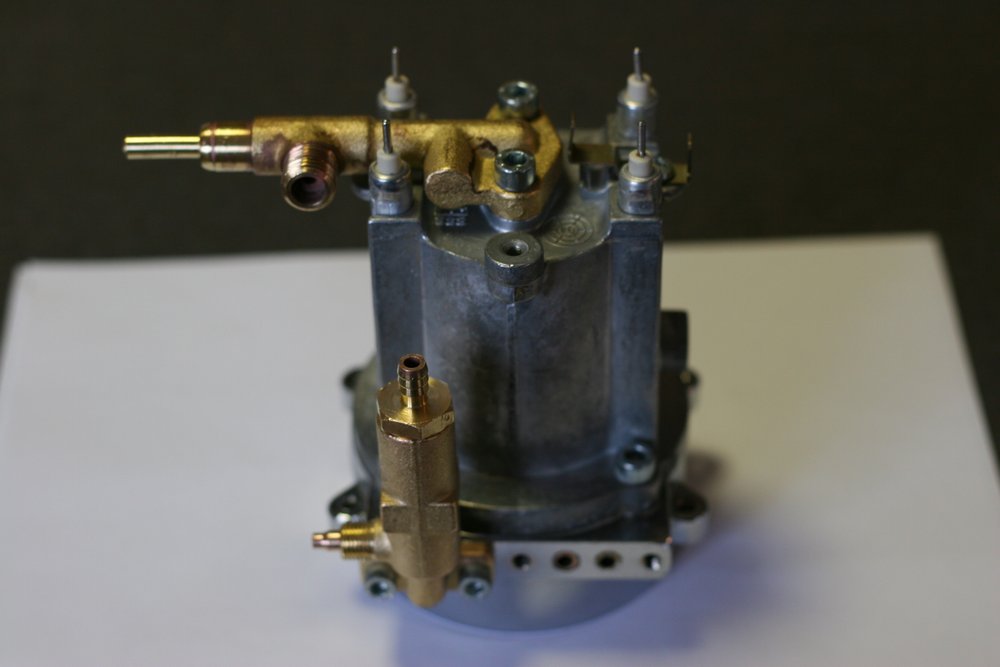
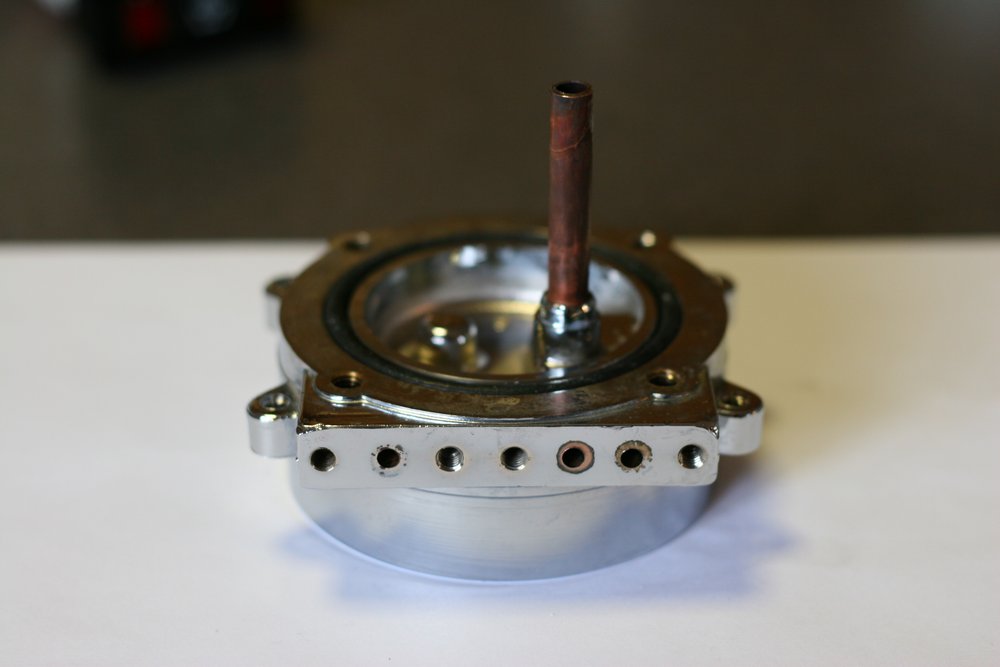
Now grab an allen wrench and take off the metal block that resides under the shower head. You should now be able to see the top of the group.
Using a plastic spudge, flathead screwdriver, or even your fingernails, carefully pry up the rubber gasket from inside the group.
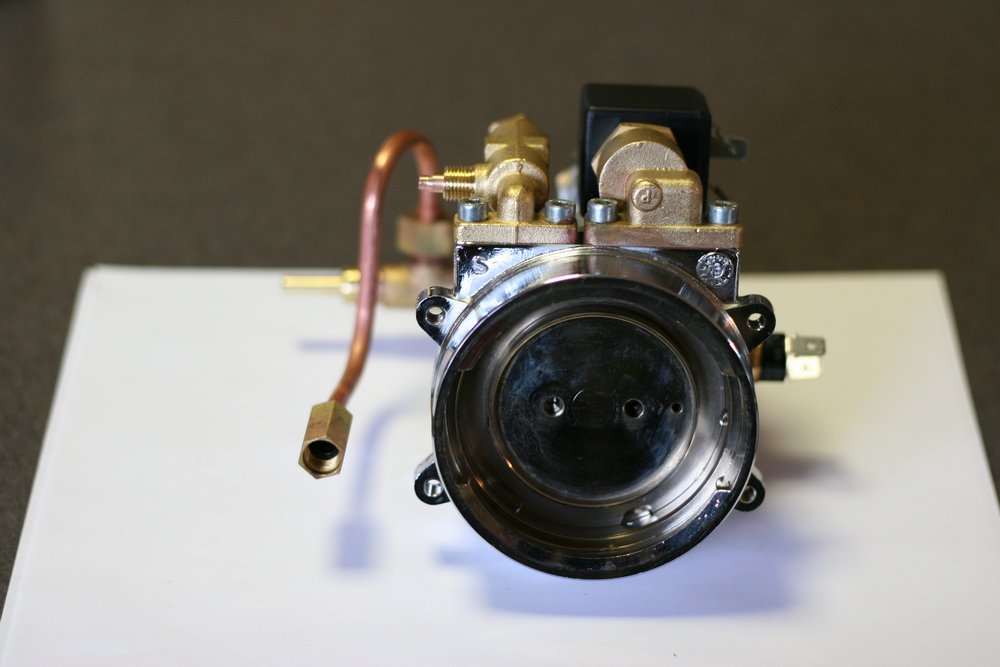
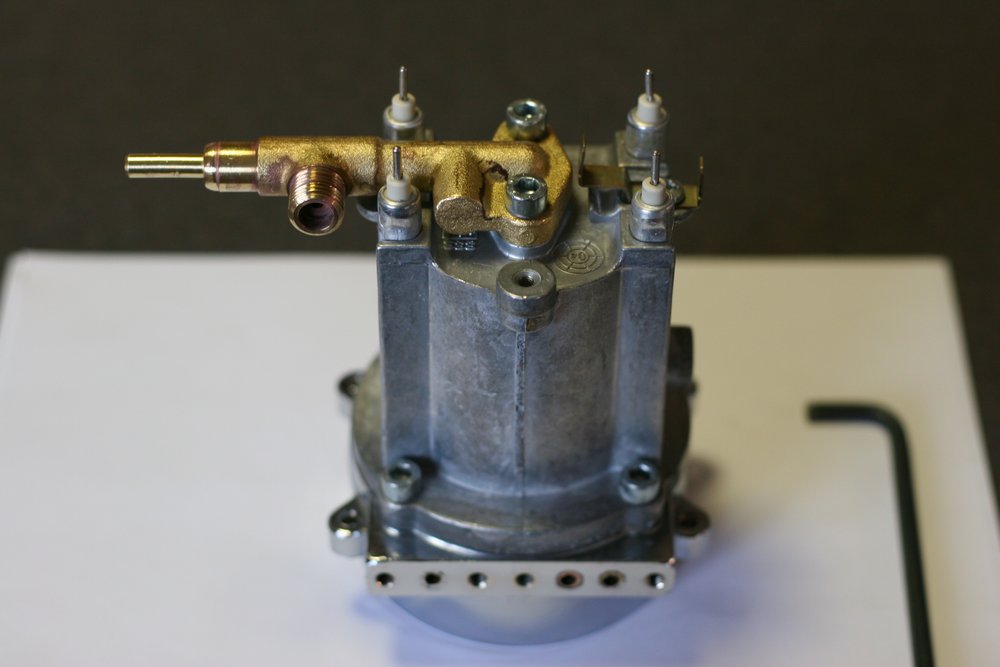
Now flip your boiler assembly back up on end.

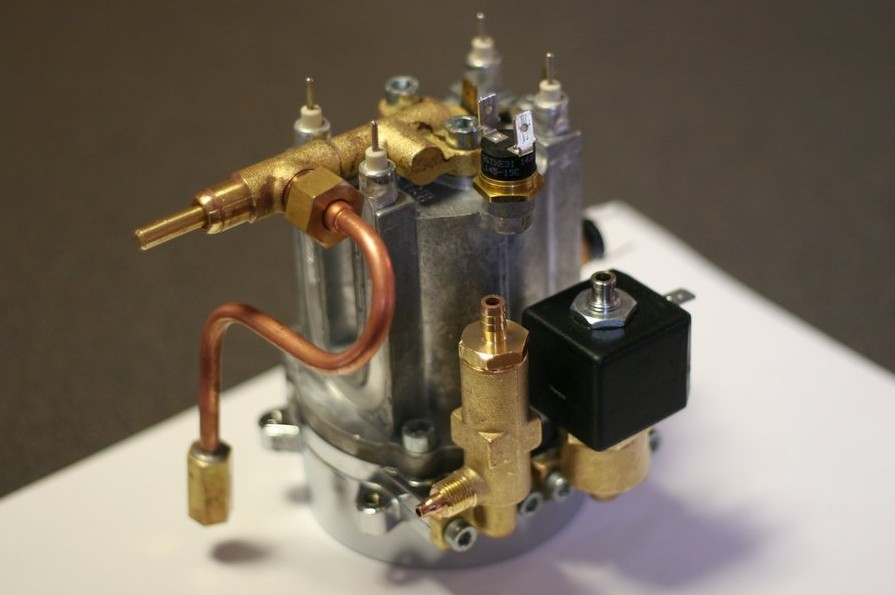
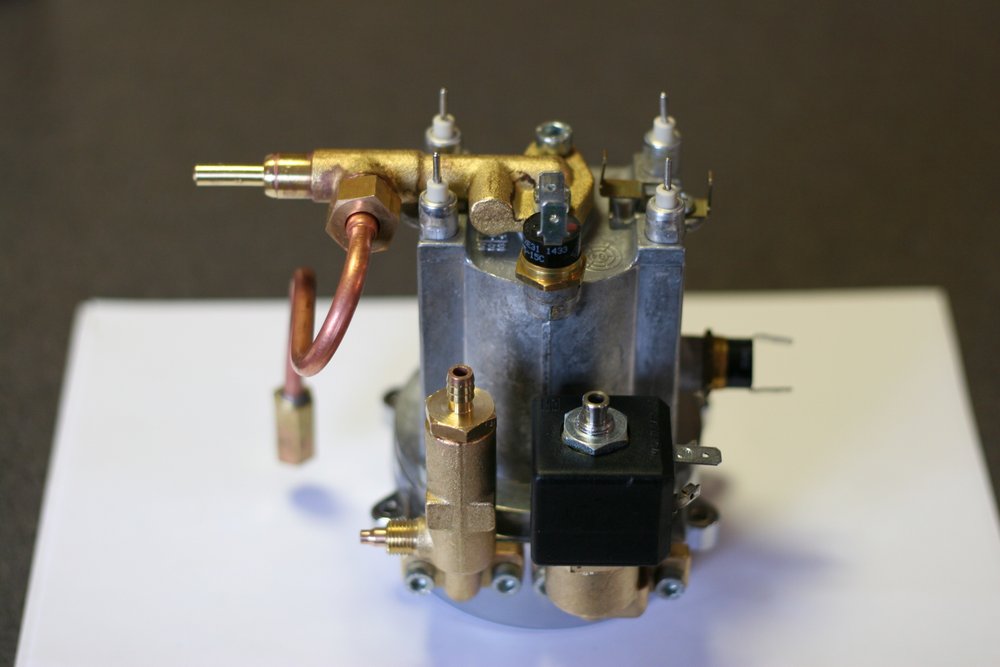
Using a wrench, remove the steel nut from the top of the solenoid valve. The black solenoid coil should slide off freely. Next, unscrew both of the thermal switches from the top and the side of the boiler. The high temperature switch goes on top, and the low temperature (brew) thermal switch goes on the right side of the boiler.
Now remove the solenoid valve assembly from the boiler using an allen wrench. You might want to take out the rubber o-rings for cleaning if they are badly calcified.
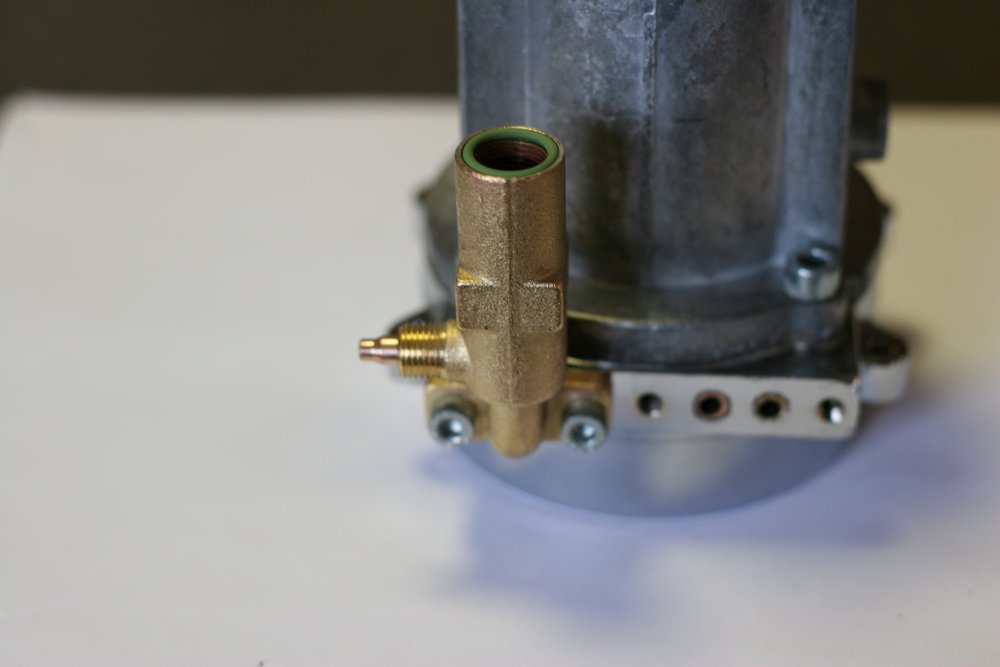
At this point you can unscrew the hose fitting on the top of the OPV. This is most easily done when the assembly is still attached to the boiler.
Now unscrew the entire OPV assembly from the boiler. Once again, you might want to remove the rubber o-rings for cleaning if they are looking shabby.
Now is the time to remove the steam valve. This step can be a bit tricky, especially if your machine is older. I recommend removing the two bolts and twisting the valve back and forth. After some twisting, use a flathead screwdriver to carefully pry each side of the valve until it comes free. Don’t be too aggressive, as brass is a soft metal. You’ll probably want to remove the rubber gasket as well, mine was very calcified.
Next, remove the four bolts attaching your boiler to your group, and your machine should be fully disassembled! You’ll want to remove the rubber gasket from its slot in the group, if you have an older machine this gasket and its slot will definitely need some cleaning.
Cleaning
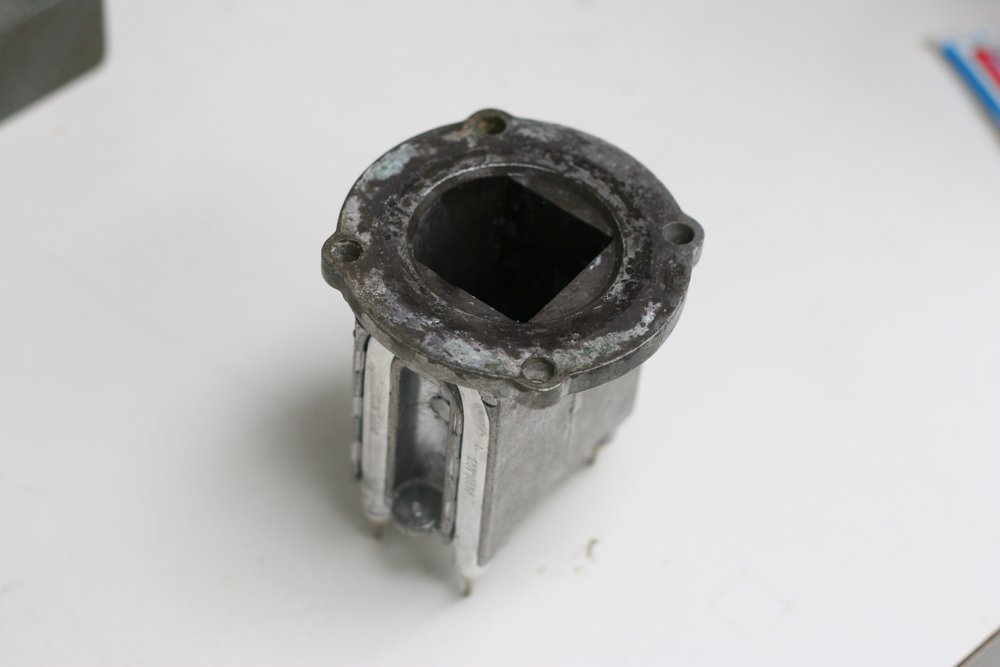
Your boiler probably looks something like the photo above and/or it might look white with calcification. Pretty nasty. If you have a lot of white calcification, a brass brush (available at most hardware stores) will take care of it. If you have a lot of oxidation and black residue like I had, a dremel tool with a stainless steel brush attachment will get the job done.
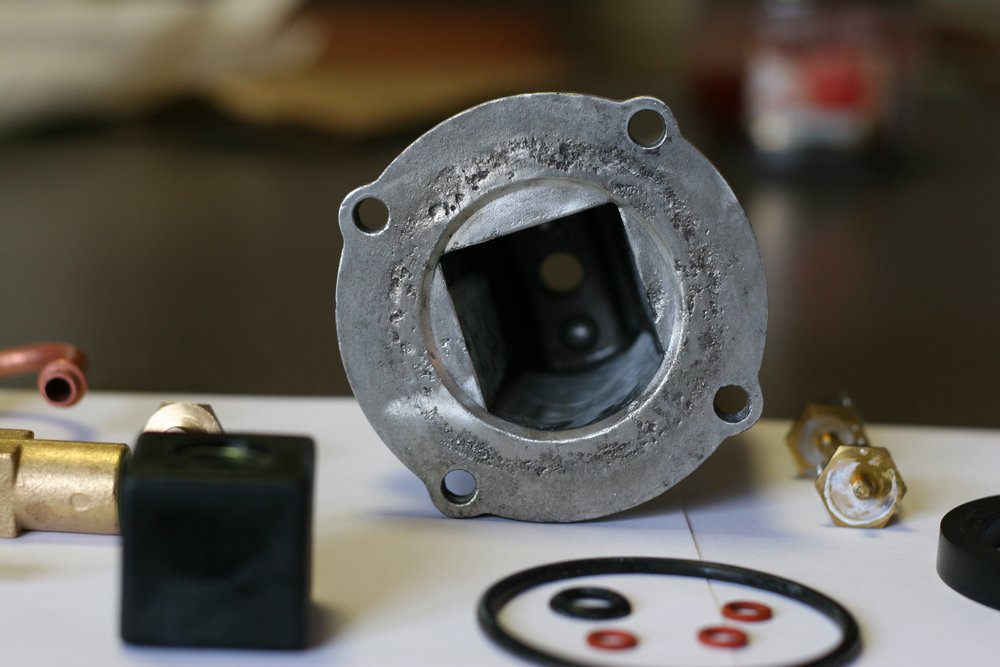
Above is my boiler after significant dremeling and brass-brushing. It’s not great, but it’s good enough for me. Although the aluminum around the seal is very pitted, I haven’t experienced any leaks whatsoever.
To clean the rest of your components, I recommend soaking them in a solution of citric acid or special-purpose espresso machine cleaning solution (available at many online retailers). This will remove significant amounts of calcification.
If your machine is as old as mine, you might need to do some more intensive cleaning. Try using a brass brush with your citric acid or espresso machine cleaner solution. Use the brush to clean off brass fittings (especially the steam valve fitting), the group, and any other metal components. This should take off any lingering calcification or other gunk.
Now that you’ve cleaned everything up, it’s time to put things back together! If you need additional help, just read this guide backwards to get a good idea of how to re-assemble machine.
Ethan is a computer engineer and open source hardware/software developer from Michigan. He enjoys AVR and linux development, photography, mountain biking, and drinking significant amounts of home-roasted coffee. Find out more at ethanzonca.com.
Cool — Thanks for posting this!
Nice job !
I think the pitting may indicate it was cleaned with vinegar, which I think I read reacts with aluminum. The boiler of my old machine became much more leaky after I ran vinegar through the system–to the point that I sold it cheap to someone interested in rehabilitating it.
Very neat and clean images that made me understood very well. Thanks for sharing this. I am gonna try it soon.
Hi Ethan,
I serviced my Gaggia Classic today using only your guide for assistance. I’m glad to say it went swimmingly. I replaced all seals (the boiler seal had been leaking) and cleaned the insides using a Dremel + wire brush attachment. The only thing I failed with was removing the steam valve. I just couldn’t get it to budge at all. Regardless, the machine is now working much better than before and is clean inside and out.
I just wanted to say thanks for taking the time to put up this excellent guide.
– Rory
Things should improve with Gaggia’s new descaling instructions, using only the steam valve and turning the machine off while the chemicals do their work. This means it is virtually a cold (or lukewarm) process rather than their previous instructions which had the heating elements switched on throughout the whole process. Best wishes, James
Great pics and description Ethan.
Thanks. It’s a fairly simple job but that doesn’t mean it isn’t a hell of a lot easier to do with a resource like yours.
My machine was well overdue for a strip down and it is so badly corroded inside the boiler that it makes your’s look like it just got shipped from factory to showroom.
Right now I have the “metal block that resides under the shower head*” sitting in WD40 in the hope that a hugely stubborn Allen Bolt will come off tomorrow. It’s one off two pieces that won’t break away. The OPV assembly wpon’t come off from the boiler either.
(*the block which needs taking off in order “to see the top of the group”)
In the meantime I have just one question.
You say we will “want to remove the rubber gasket from its slot in the group, if you have an older machine this gasket and its slot will definitely need some cleaning”
I don’t want to remove it unless I can find a replacement. It looks like it’ll fall apart if I try to move it. Any ideas re where to find a replacement gasket?
Rik, Sydney, Australia
Hey Rik, there are actually a couple sites selling replacement parts for the Classic since it’s such a popular machine. Check out partsguru, they sell pretty much any part you might need. Good luck with your stuck allen bolt!
Hi Rik,
This thread’s a little old, but just in case… I’ve been able to all my Classic parts from http://dibartoli.com.au/ in Bondi Junction. All by mail, but they probably do walk-ins as well.
Cheers
Thanks for the info. One other thing I’d like to know is if you or anyone knows if non-aluminium boilers are available for this or other home espresso machines.
Frankly I’m a little disturbed by how much aluminium has eroded and doubtless made it into my diet. Big pits and holes.
G’day, Did you ever find a non aluminium boiler?
No Phil,
I did not. So the machine is sitting, dismantled in my laundry and I’m using a machine that has a stainless steel heating system.
This is a great explanation but I am totally at a loss with taking things apart. I have regularly de-scaled my machine and recently took apart the group head and replaced the rubber seal with a brand new one but for some reason water does not appear to be going up the tubes into the machine…the pump makes the usual sound but not a drip of water anywhere! I am hoping that it is something really simple as beginning to get demented! Any help would be gratefully received, I have had my machine for over a couple of years…missing my coffee 🙁
Hi Mick,
I did the complete strip down (twice) to no avail. After more research I checked the continuity on the solenoid which indicated it had failed so I found a replacememt on the internet and installed it. (Lesson learned ?….. Check the solenoid first ! )
The flow through the brewhead was now magically restored to normal, but my steam had mysteriously and annoyingly disappeared! After a bit more research I replaced the steam thermostat. Now everything is back to normal (except a previously non existing noise has developed, like the braying of a demented donkey followed by noisy rapid bubbling just before the steam light comes on. Any thoughts on this from the experts ?)
Anyway, I don’t regret doing the strip down as it familiarised me with my machines inner mysteries, and at least I know it’s clean!
Good luck with your problem. I can forward the solenoid suppliers details if you need them.
Regards
You’ve probably solved the problem by now but it seems the 3-way valve in your machine is stuck. This is the little black box connected to the bottem of the boiler. Take it off and try to disassemble it as far as possible and make a note or take photos, so you know exactly where all the parts belong. Be careful, there are some very tiny parts inside. You can clean them with warm water en let them soak in a bit of Gaggia descaler for an hour. Clean them again and reassembly. Your machine should give water again, at least through the steam valve.
I would be very grateful for any advice you could offer.
My two year old classic (which has been descaled regularly) produces hot water and steam through the wand but not through the brew head. I followed the guide on another site to remove and clean the solenoid, (which had no signs of scale). Unfortunately this has not solved the problem.
I am considering following your excellent guide to completely strip and clean my machine. Do you have any other suggestions before I do that ?
many thanks for your time.
Peter – I’m in the same position. Having taken both the brew head assembly and the solenoid off, and given them a thorough clean, it hasn’t solved the problem. Did you have any replies about what to do next, other than a complete strip-down? I’m planning to have another go with some descaling chemical before going any further. Any advice welcomed!
mine is one year old and I am only getting hot water through the wand but not through the brew head. As I turned it on both switches lights go on. Any clue about what it could be? Thanks. Jose
Hi Ethan,
Awesome post, thank you. My machine has an issue where there’s basically no water coming through the group head. I’ve put a new pump in but apart from being remarkably quieter there’s no difference. On the picture labelled ‘group head’, the copper(?brass?) pipe that comes through, is that supposed to be clear? Apart from that do you have any ideas? Really appreciate any advice!
If you think that the pipe might be clogged, definitely run a pipe cleaner or brush through it! You can try blowing air through it to see if it is completely blocked (it is routed to the slightly copper-stained hole on the side of the group in that photo, if I remember correctly).
What a fantastic website! I just fixed my problem with some hardcore limescale remover (old school with wine vinegar), but I’m sure at some point in the next 10 years I’ll be turning back to this. Brilliant, brilliant blog!
Wondering if you might be able to help me-machine is only 3 months old and des caled twice. Group head only drips water. Cleaned shower screen and removed group head to clean. Looked inside machine at connections, hoses etc. all looks great and brand new. Steam and hot water work fine. Have primed it several times. Thoughts?
I had much the same problem Lynn, (although it took me a lot longer than 3 months to get there!) turned out that the shower plate (not the screen, but the metal block it’s screwed into) was blocked. I took that off and cleaned it and all’s well.
That’s the short answer, full version is that firstly the plate was very hard to get off. (about 9th pic down, “Now grab an allen wrench and take off the metal block that resides under the shower head. You should now be able to see the top of the group.”) Found a tip on another website that if you find a screw that’s the same as the one that holds the shower screen on but longer, screw that in and keep going it will dislodge. Cleaning was another matter all together. Tried all sorts of things but the ‘gunk’ was baked solid. Used a Dremel (actually a Ryobi, but same thing) with a wire brush attachment to get rid of it all. There’s 4 small holes in this plate that the water comes through and it doesn’t take much to block them or the flow to them.
Good luck!
Hi, Ethan, My Gaggia Classic looks different from your pics, but anyway, someone stupid put coffee into the water tank and ran it while I was not home. As a result coffee clogged the plastic tube. I can see coffee in the tube trying to get through. I was able to remove one end of the the tube which was screwed in with metal piece, but cannot remove other end, which seems welded (?). So, I cannot clean it. Any suggestion? Is it worth to struggle, because coffee may have been already deep into the system beyond the tube already.
Hmm, you might be able to get a pipe cleaner or drain snake down the pipe and pull some of the gunk out. If you have an ultrasonic cleaner, that might work as well. Good luck!
After looking at my broken Gaggia Classic on the kitchen counter for two years and after one failed attempt, I decided to repair it over a holiday weekend. Your article was absolutely invaluable and guided me all the way. I had to supplement the main washer at the bottle of the boiler with a very thin plastic addition. Now it’s fully back in action! Cheers – Michael (Dublin, Ireland)
Great and detailed post, thank you for your effort, if I haven’t ran across this article I would never got involved in dissembling this machine…now I’m glad I did it…Just to add one thing that might help someone not so experienced in wiring and electricity. Before disconnecting wires from the front panel switch block I took a picture so I can work out wire coloring to connect them back afterwards…this haven’t seemed to be enough information though…blue wires were not all at the same voltage (contrary to my logic) so when I connected them back switch block was working improperly…so take care of the blue wires, follow the one which comes from AC and take note of the remaining two blue wires and mark their switch connectors properly before disconnecting. Another wiring confusion that can arouse are heater(boiler) contacts (3 black and one yellow wires are connected to four pin connectors) This is in fact two resistors connected in series as two of the black wires are same wire(short circuit) Mark this wire and make sure that you don’t short circuit same heater (which could happen if you follow only wire color logic) as this will result in having all the voltage on one heater and other one off the power. Cheers from Belgrade, Serbia
A great website. I am about to dig into my haggis classic machine and this guide is perfect. Thanks for your wiring suggestions I will make sure to take a picture of all my work. My problem is while making expresso the whole unit went dead. No pump no steam no lights… nothing. An electrical issue for sure but does anyone have an idea of where to start?
Barry Nobles
Hi, thermal fuse has blown. Local electronics store (in my case, MAPLINS UK) should have a replacement thermal fuse. The type you need is a 180degree centigrade. I paid 99p for mine, from the Gaggia spares supplier, it was £4-95 plus £4-95 carriage and handling. You need to use a heat sink when soldering the new one in as the heat of the soldering iron will melt the fuse again. I used a clamp on fish disgorger.
Fantastic informations.
Just to tell you : Thank you
From Montreal, Quebec Canada
Hi Ethan,
Yesterday my Gaggia was having trouble, little water was pouring, and at the end of the day there was almost no water was coming out.
It was obvious something was blocking the head, because the milk steamer didn’t had any problems with the water.
I’ve followed your steps and disassembled and assembled the Gaggia Classic, but when attached on the power it allways short circuits. I have googled and read the same thing happened to another person
http://coffeesnobs.com.au/brewing-equipment-midrange-500-1500/34645-gaggia-classic-electrical-issue.html
Here he mentions the problem is with the boiler element. I know from my experience with my Whirlpool oven that if the heating elements get wet (happens when you don’t use the oven for three months) this will short circuits the ground in my house.
The solution is to temporary break the ground line on the 220V power, switch on the machine and heat up the boiler until the heating element becomes dry. (1 hour will do it).
Then you can attach the ground again on the 220V.
Problem is fixed and my Gaggia is working good! Thanks for the info.
Sorry for my poor English, if I make any grammar errors, please forgive me.
Hi, If the plate that the spray plate screws onto is well and truly corroded like mine was, turn the (empty) machine upside down, remove the spray plate and the 2 Allen screws and use a plastic hypodermic syringe to inject citric acid mixture into the holes and be patient, leave the machine for at least an hour to break down the lime scale inside. You may need to add more solution during this time to keep the holes filled.
Then get a long 5mm machine screw and screw into the shower plate fixing hole and it will jack the back plate away from the brew head. Be patient, if at first it doesn’t come free, let it soak a bit longer. It does work.
Very useful article, many thanks.
I’ve done all of this a few times but there’s one step I can’t accomplish:
“Now grab an allen wrench and take off the metal block that resides under the shower head. You should now be able to see the top of the group.”
That metal block may as well be sealed on. The allan bolts come out easily but the peice they secure seems permanently stuck on. I suspect the only reason I can’t pump water through the group head anymore is due to calcification between these parts. The rest of the parts are clean.
Any advice?
Currently I’m resigned to selling it for parts (let me know if you’re interested), since the rest of it is in good working order and I replaced the pump last year with one that has brass fittings.
I can’t get the metal peice off the group. The allan bolts come out easily, but the metal peice seems like its sealed on. Any tips?
See my posting about stuck plates, inject citric acid descaler into the bolt holes (with the machine upside down) and leave to soak for at least an hour, then put a long thread 5mm screw into the shower plate hole and carefully turn it to force the plate out. If it won’t come easily, leave it to soak for longer. Keep the solution topped up. It does work, but may take some time.
It might be worth mentioning that you would want to let the whole machine fully cool down before stripping it. Mine was still warm in places and I think that’s why my High Temperature switch screw snapped while I was unscrewing – meaning I have to buy a new boiler and switch.
Also even if the group head is stuck – do not use WD40 – you wont be able to remove the lubricant from the metal parts and your coffees will have a slight taste to them for a long time!
Great tutorial! It all went well until I had to put the steam knob back on. It was stripped and cracked, likely from when I removed it. I ordered a new knob, but I can’t seem to get it on right. The steam valve is somehow slightly open and leaking steam almost as soon as I turn on the machine, and I really need to get the knob on there to close the valve. Any tips?
Hi Heather,
Putting a new knob on the steam valve will not stop the steam leak. My machine is three years old and since the first year has leaked continuously. I sent the machine back to Philips for service, which was a waste of time as tall they appeared to do was to replace the thermal fuse which had blown and the sealing ring was nor replaced, as the spray head was corroded in solid. We are a very hard water area. Earlier this year I paid £70 to a local company to service it and they said the only thing wrong with it was a fault in the mains lead, which when I had it independently tested was NOT faulty. Again they did not replace the main seal or the valve seal. I learned how to replace the main seal and how to get the spray head out (see my post) and now do all my own servicing. You may need to replace the whole valve, if replacing the valve seal doesn’t work. Good luck
I got in and checked the steam valve, and all seems well. It really is a matter of getting the knob and the plastic collar inside the machine to meet up properly. Any advice?
Well done, how about you should take time out and come and sort mine out for me. Another one on the list to do eventually.
Regards
Grandad455
Same problem as many above. One of two 6m hex screws holding the group onto the boiler became stripped . . . used wrong kind instead of metric. Had to drill the screw out and then use a screw remover to get bolt out. Can’t get group to separate so will try your suggestion of using a longer bolt to jack it out.
I am posting this as my unit became clogged after I used a commercial grinder on “espresso” grind and the grind was much to fine. Back washed through the screen and the head became clogged (I reason). I havn’t been able to clean it out so will use the back out bolt method.
A warning, my information is that espresso grind should be table salt in size! From now on I will be more watchful!
Don’t over do the pressure on the back screw, either the screw will strip the thread or shear off. See my posting about injecting descaler into the group head and letting it soak for a couple of hours. Be patient, buy a back up machine so you can have coffee while you work on it!
Hi! I have taken my Gaggia Espresso apart and cleaned it like in your tutorial. Mostly it seems the same except I don’t have a solenoid valve. I have also taken the pump apart and cleaned that, I found another tutorial on how to do that. The problem I now have is that there is a small black ball that fell out when I lifted the machinery out. I don’t know where it came from! Any ideas? There is another small white ball that was inside the pump, the black ball is slightly larger.
Superb write-up. My 10yr old Classic would not heat at all so I used multimeter to check in this order, Thermofuse on top left of boiler(fine), connectivity of all leads(fine) and lastly the resistance across both heating elements and sure enough the main element was extremely high resistance, so ordered from MrBean2cup a new boiler assembly £39. While I waited for post used your very clear guide to dismantle everything and soak in descaler.
I had temporary problems: The steam valve on top was on really tight and would not budge. I found it easiest to remove group from bottom of boiler first and let some descaler work its way around boiler and into the gasket between steam valve assembly and top of boiler and finally with boiler right way up again wiggling steam valve assembly forwards and backwards as levering it up and down would not work. Mine was really crusted up with limescale.
I made sure to soak the steam valve assembly in descaler and remembering to fully open and close the steam valve to let the descaler get everywhere.
I had a problem getting the group head block off too. I found easiest way to get it off was to find a long bolt of same screw guage as that which holds shower screen in place and screw that down. It pulls the group head block away nicely.
I have descaled my machine regularly but still that group head block was very limescaled and needed soaking, scraping and more soaking. to clean it all off.
Lastly my strong advice is something I always do. Number every connector and pin that it connects to as you remove connections with feltip pin. this makes reassembly much quicker as there are many connections and little slack.
Your great description gave me the confidence to dismantle and do a total overhaul so huge thanks. The machine runs so much better now, especially the steam wand, which I had already upgraded to the Rancilio Silva wand before.
My next planned mod is to dial back the pressure to 9 bar and dial it back in again.
The steam spout on my 30year old Gaggia has gotten so I the steam spout can’t be shut off entirely. So, while making the espresso, steam that continues to come through the steam spout accumulates a 1/3 cup of water in a cup I set under the steam spout.
I also occasionally have water dripping under the edge of the top part of the machine.
I assume those are separate problems.
Before I start trying to take the machine apart, any suggestions on what new parts I am likely to need?
Thank you.
Margaret
The pump on my Gaggia Classic seems to have stopped working.Complete silence when the brew switch is pressed.
Is it time for a pump replacement or are there any trouble shooting steps I can try first ?
Any advice would be much appreciated.
Great post, thanks! Wondering if you happen to have some dimensions from the group head? Doing some design and planning to use the Classic as a parts template…
Descaling stopped group head flow…
I used the Gaggia Classic daily for 7 years. I don’t use the milk frother. Pressure and flow rate dropped dramatically in the last week. I cleaned behind the shower screen, which was very blocked. This only helped a tiny bit. Then I followed online YouTube instructions for descaling. I noticed some granules in the bottom of the cups used to catch the descaling water as it left the machine. At the final ” flushing” stage the group head blocked completely. I removed the 2 Allen screws behind the shower head. I removed the round aluminium block and poked dried coffee out of 4 holes in it. I noticed 1 inlet hole in the machine which leads to the round aluminium block. It had clogged with the granules. I cleaned the hole with a toothpick. I reassembled it all again. Water flows better now. It appears that for some reason the descaling process blocked my machine in this instance. Tomorrow I get to have a coffee again.
Just another note to say thanks for this post. My four year old classic was behaving exactly as described despite having been to Gaggia service two years ago for the same problem. This time I followed your guide and it is now back in rude health.
One small point – I think that it is easier if you take the steam pipe off right at the start of the process and put it back last.Otherwise your guide worked like a dream.
Thanks for the clear instructions!
Good job !!! That being said, in my case I similarly bought a not perfect Classic off EBay (unknowingly) but since the seller gave me back a few dollars I decided to keep this practically new machine that I believe has a cracked boiler. So …
1) I see no reason to pull the pump. Just going to disconnect hose right at the valve assembly with the big orangish rubber safet device.
2) No need to release the main switch from the body. Just accurately take note of where each electrical connection goes.
3) To me it seems better to remove the the steam wand while the brew head assembly is firmly attached and in place. Less risk of breaking something plus it is firmly in place.
Right now this is all I see. Anything you may disagree with before I jump in ?
Thanks for all your work with great photos. Wouldn’t mind knowing what size wrenches are needed since I’m in another country and virtually too less at this time. Will try to borrow the necessary wrenches and am going to ship my nice West Marine tool kit when I visit in the spring.
Sounds like a good plan. Unfortunately I don’t remember the size of wrenches for the machine, hopefully you can borrow everything you need!
Hi Ethan and all,
The block held in with the two Allen bolts, to which the screen attaches? Man, I cannot remove this!
I think I’ve had it off in the past, on earlier cleanings. But it does not budge. And I know I need to
get it off, because two of the four water passageways are blocked.
Have tried prying with two blade screwdrivers, put like-diameter steel rods in the water channels
to try twisting it… no dice. I’ve tried getting it off when the machine was warm, and when cold.
Any suggestions welcome — surely someone else has run into this?
That’s pretty crazy! I might try lightly tapping a screwdriver with a hammer while prying, but this could damage the block. However, if you do damage the block, you can buy replacements online at various parts stores. Just don’t damage the rest of the group, those are a bit harder to come by!
Hi, Try going back through the information in previous posts. You will find this subject has been covered in detail. Your main problem is the block has been stuck in by a build up of lime-scale. Take the two bolts out with the machine upside down, and inject or dribble descaler solution into the bolt holes leave it for at least two hours, topping up the solution as needed. Insert an M 5 machine screw about 30mm long into the centre shower plate fixing hole and slowly apply pressure. This will lift the shower-block out. Do not force it, you might strip the thread. Use plenty of patience. Good Luck
Hi Rob,
Just cleaning my Gaggia and had exactly the same problem. All other tips I saw like prying it off using flat head screwdriver or using pliers are more likely you ending up cutting your wrists then moving the group head. Did you try Craig’s tip (posted March 2014), ie taking same thread bolt but longer, screw it into the whole that holds the shower plate and just keep going? That worked perfectly for me! The bolt needs to have a length of about 15mm, so needs to be quite a bit longer.
Good luck
And Ethan, thanks for this awesome set of instructions.
Hendrik
thanks so much for the advice re being able to get the block off the head by screwing a longer screw through the centre and the block came free.
I had difficulty getting one of the two bolts free before doing this.
I had to resort to using a hammer on the allen key which freed it after a few goes.The rubber seal is actually quite thick and I turned it over after i prized it out of its groove.
I cleaned everything I could and reassembled it using some silicon on the bolts and on the rubber seal to make it a little easier to make the coffee
I noticed a few people having trouble getting the block that the screen screws to free. I had the same trouble, so made myself a custom “puller” just like we use when pulling apart press fitted components on race engines. You need a rigid bar to span across the group head, a M5 machine screw (fully threaded bolt), an M5 nut and washer.
I used a bit if 25mm RHS for the bar. Drill a hole in the centre big enough for the bolt to go through easily. Then thread the nut on all the way, then the washer and then the bar.
Now screw the bolt into the threaded hole in the offending block until firm.
Now hold the bolt head still with a spanner and do up the nut with a second one. It will pull the block out cleanly in a straight line. Hope that helps what is a tremendous post on caring for the wonderful Gaggia Classic.
This is great. But I have a really stupid question.
I can’t get the steel bypass tube off to remove the water reservoir, it is per installed, on another blog. The fella says it should just pull out as it is kept there by friction…in my case the kinda friction that seems to require a blow torch to release!
Any suggestions?
At the top of the tube there is what looks like a ‘nut’, I’ve tried pliers, but it simply doesn’t ‘bite’.
Fixing for a friend…all help gratefully received. 🙂
Cancel my query, got it!
Just kept fiddling and pulling at it with my hands, and moving sideways, eventually just came out…hurray!
Looks a bit sticky, goodness knows how long it’s been stuck, anyways sorry to take up yer time with this.
Don’t publish if you feel this is irrelevant. 🙂
Great guide, thank you very much! Coffee now flowing freely again.
Hi Ethan,
I need help on a two things.
1) Disconnecting the indicator lights (green and red) – I have the Gaggia Coffee
2) The 4 Allen bolt screws that connect the OPV assembly to the boiler are stuck. It looks like they are corroded. Any tips on how to remove them?
Thank you for posting clear staight forward instruction & excellent photographs. Together these have given me the confidence to undertake this task with our two year old gaggia Classic which is not producing sufficient pressure to produce a satisfactory cup of coffee.
I am most grateful to you and will post report of my success!!! once I have completed the task.
This guide was great. Turns out the boiler is cracked in two so I will look into a new part. But I have another question:
The block under the shower screen won’t budge. Any ideas on how to get this off without damaging it? Or, is it not that important to take it off?
Thank you.
many thanks for the good manual! My 10 year old Gaggia, was a little dirty and clogged but does it again as before.
thanks again and greetings, Martijn Bertram and now espresso!
Great write up, thanks! A word of warning for any fellow newbies – the thermostat switch screw threads snap easily as they are brass, so don’t use too much force when reassembling!
I’ve superglued the switch in place (making sure to maintain the metal to metal contact), we’ll see if it works but I thought it was worth a try before forking out for a replacement switch…
Hi Ethan and everyone,
Thanks for these excellent instructions. I’ve just reassembled my freshly cleaned machine. Unfortunately I can’t get it to switch on now, or rather when I flick the power switch it causes a fault and trips the main circuit breaker.
I thought I was being careful when disconnecting and reconnecting the electricals but I’m a total noob…
Any ideas from the protofusion hive? I really need a coffee!!
Thanks in advance!
Any ideas from the
This is lifted from Coffeesnobs – and it worked for me too!
“I found this forum while searching for a fix to an RCD tripping issue with my Gaggia Classic after stripping and descaling the boiler. It lead me to this thread in which someone else suffered the same issue:
http://coffeesnobs.com.au/brewing-equipment-midrange-500-1500/34645-gaggia-classic-electrical-issue.html
I thought I’d take the time to set out my findings and what I did to sort the issue.
The problem arises, in this model, because the heating elements are two external u-shaped items that do not normally see any physical immersion in water. The central core of these elements is insulated from the body of the machine by a ceramic material, and this ceramic material is porous. When you strip the boiler and, as I and most people would, then proceed to scrape, flush, descale with viakal (or similar) and flush again, the ceramic layer gets saturated. This is enough to give a path to earth for the current when you power up the machine, and today’s sensitive RCDs trip out instantly.
The cure? You can replace the boiler if you’re in a rush and loaded, or you can stick the machine in the airing cupboard for a month if you’re skint and risk-averse.
What did I do? First I disconnected the power feed to the boiler so that I could power up the machine and prime the boiler full of water. Then I turned the power off again and reconnected the boiler power. I then disconnected the two body earths and taped them out of the way. Next I turned the power back on, being careful to not touch the metal body of the machine. This allowed the elements to heat up without tripping the RCD, and they get hot really quickly, driving the moist it out in seconds. I then reinstated the earths, and normal service was resumed. “
I just purchased the Gaggia Classic. Upon opening and removing the plastic bags over the parts, I had to unscrew this long, pencil-thin stainless arm (on the far left of the front of the machine) to get take off the plastic and get the power cord which was back in the water tank. Tilting it forward to do this, the nut that the stainless arm screws up into slid across under the cup warmer plate on top. Now I can’t screw this arm back in when there is no access to the nut out of place? What is the purpose of this thin arm?. The manu
al does not show it as a part,. It is not pictured on the front of my instruction manual, and yet it must be important if it screws in at the top.
Just wanted to say ‘Thanks!’.
My Gaggia got clogged after a few months of not being used. Taking it apart and putting it back together was much easier thanks to your guide! Thanks!
Having stripped and cleaned my machine, it now trips the electrics, I took loads of detailed pictures to ensure the wiring went back exactly the same could a failed component be causing this ?