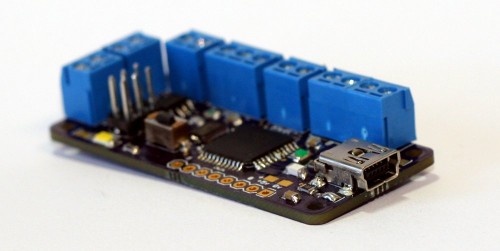
The first prototype ZonCoffee v3 boards have arrived and are nearly up and running. I’m currently porting the code over to Arduino 1.0, as this board uses the Arduino Leonardo bootloader. Read on past the break for more info on the new board.
v3 Features:
- 6-Pin AUX port allows use of parallel LCD or custom expansion
- Supports SparkFun serial LCD
- USB port emulates virtual serial port for logging and loading new firmware
- All ports broken out to screw terminals
- Power via USB or external independent power source
- MAX6675-compatible footprint (also supports Maxim-IC’s newer chips)
- 6-Pin ICSP header for flashing custom bootloaders
- Main power and USB power LED indicators
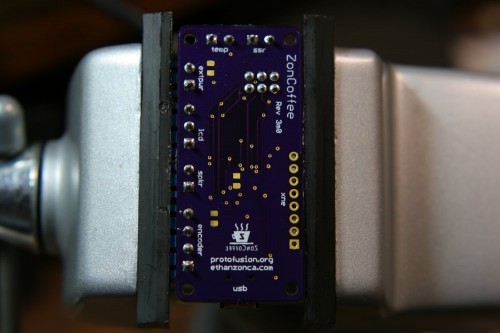
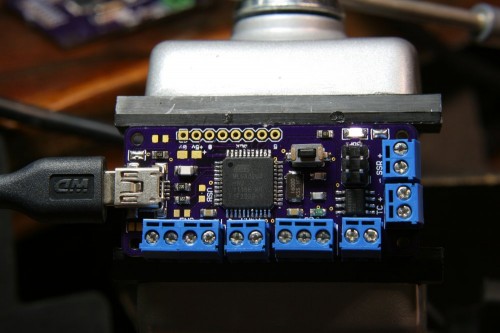
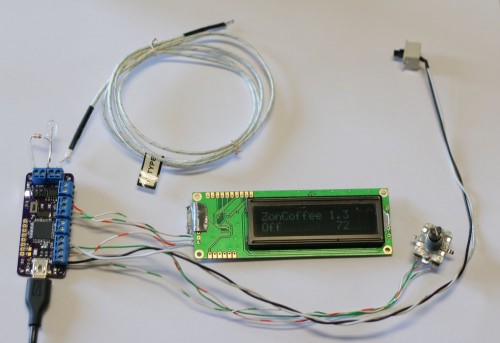
This PCB includes connectors for external power, a SparkFun serial LCD, a pusbutton encoder, a thermocouple probe, a solid-state relay, and an auxiliary port. The auxiliary port pins are all connected to the ADC, allowing additional analog or digital IO for expansion. Note that the logo is silkscreened backwards, which is the only (thankfully superficial!) problem I have encountered with my board so far.
The PCB is populated with an ATMEGA32u4, an 8-bit Automotive-grade microcontroller from Atmel that features a USB interface as well as USART and SPI. This board takes advantage of USART for the SparkFun serial LCD, SPI for interfacing with the MAX6675 thermocouple interface chip, and USB for logging and updating firmware with a computer. All parts on the PCB aside from headers are surface-mount, allowing a very compact design. For permanent installation, screw terminals can be depopulated and wires soldered directly to the board (except for the thermocouple leads, which cannot be soldered).
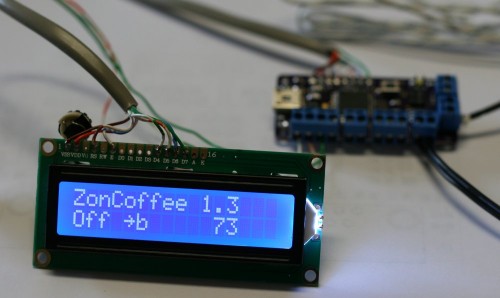
I have fully populated and tested two of these PCBs so far, and everything is completely functional. There are still a few software quirks from porting my original code to Arduino 1.0, but the boards themselves are fully functional. After a bit of tweaking with the encoder library and creating a drop-in library for attaching a HD44780 LCD to the auxiliary port, this design should be completely usable. I have one board up and running on my espresso machine for both use and development, and I also have a board attached to my roaster (modified Poppery I) that I will be using to experiment with ramping the setpoint for temperature-controlled coffee roasting.
Want to get one?
I’m planning on making a small beta run of boards in the coming months. Drop me an email or a comment below if you’re interested. I haven’t priced the beta boards out yet, but they will be available at a reduced price as long as you’re willing to provide a bit of feedback on the system.
Update (2/9/12)
Development on ZonCoffee has been a bit slow lately, as I’ve been working on a more time-critical project. Coincidentally, the project I’ve been working on also uses the ATMega32u4 on a much larger scale, so I can backport some fixes to the Arduino Leonardo specification to this project. I should be able to resume work on this project in the next couple of weeks.
Update (2/25/12)
I just wrapped up getting the parallel LCD code up and running, users can now switch between a parallel LCD on the auxiliary port to using a 1-wire serial LCD by changing a single define in the code. The last issue I have to deal with is my rotary encoder handling. I should be ready to do a run of the boards once I get some new encoders in to test with.

Hey there,
Are you planning on selling these? I am wanting to build a really cool / unique espresso machine, and would love an PID system that mounts flush with my counter top, and possibly a knob control for temperature.
Would something like this work? How much would you sell for?
Thanks a bunch!
Kyle
Hey, sounds like an awesome project! I’d say that this system would work out really well for you, especially if you want something flush-mounted that looks a bit more classy than a standard industrial-controls-style PID unit.
I’m planning on making a small beta run of boards in the near future since my most recent round of prototypes are up and running. I do have to do some additional software tweaking to fix a couple of issues–namely supporting cheap rotary encoders that have noisy output signals, and also supporting cheap HD44780 LCDs (I only have software support for Sparkfun’s serial LCD at the moment, they’re nice, but $25 apiece). I plan on having a beta run fabbed and populated in the next couple of months, I’ll put you on my list of people to contact when the run becomes available for sale.
As for pricing, I haven’t decided if I want to sell a full kit (with solid-state relay, LCD, etc) yet, or just the board. Which would you be interested in?
I’d be interested in the full package. If you make them available I will buy 2-3 for starters. Please keep me in the loop and good work on your project!
I would be interested in purchasing a board or kit when available. Keep me informed, would be fun to upgrade my EC155.
Scott–I’ll let you know when the first run of boards are available, which should be in the next couple of months.
After almost a year with 2 set of EC155 (at home & office),
I’m very interested about adding PID myself.
Currently I’m researching methods by using Arduino,
until I found your site with similar ideas!
While I’ll continuing my study (at a primitive stage…),
I’m more happy to be advise for your kits availability!
Please keep me informed for any good news!
Regards,
Noel
If your busy with other projects, no hurry here.
Was looking at kickstarter and ran into:
http://www.kickstarter.com/projects/zpmespresso/pid-controlled-espresso-machine?ref=live
Do not know if you have seen this project or not, interesting though.
Let me know how’s the new board coming along, I am very interested in getting your mod. Can’t wait to upgrade my EC155!
Hi Ethan,
I’m about to start a Gaggia classic PID mod and found your awesome project,
I would be really interested in ordering one of your boards and wondered if the project was still active?
Also wondered if this board would work with an RTD instead of a thermocouple? Auberins have an RTD made to fit the classic and the Silvia by bolting in place of the thermostat which looks like a neat solution.
Anyhow, keep up the good work!
Hey Tom,
I actually started designing a new version of the PCB, but I haven’t wrapped it up yet. The v3 PCB works very well though, it just takes a bit of soldering if you want to use a cheap parallel LCD with it. The v3 board can work with RTDs if you use a SparkFun serial LCD (it frees up the “aux” pins), you can solder on your RTD to the aux port with one external resistor. I might look into RTD support for the new board I’m working on, having something which fits the boiler would be awesome.
As for buying the boards, I haven’t gotten any more of the v3 boards made, although I’ve had so many requests that I might get some fabricated soon. I have started designing a v4 board which will be even easier to use, but it’s still a work in progress. If I end up getting a small run of boards fabricated, I’ll let you know!
Thanks Ethan,
V4 sounds great, please do keep me in the loop if you ever do another print run.
I’m an iOS developer by trade so I’m looking to have some kind of phone interface on my mod with graphing and setpoint adjustment from the iPhone, will drop you an email if I get it going someday as it seems your a Gaggia fan too.
Thanks again and all the best.
any chance these will become available? It really like to replace the cheap PID controller I have right now.
Hey Ethan,
I’m really impressed with what you’ve done here. Like Tom, I have a Gaggia and am thinking of implementing an RTD sensor with the Arduino. I’d definitely be interested if you get a run of these boards.
Keep up the great work!
Josh
Hey Ethan
I would be interested in purchasing a board if available (to test it in an delonghi ec190). Can you let me know if they do become available?
Anyhow, keep up the good work!
Hi, Ethan.
For your new version and RTD, Maxim has this MAX31865 chip that seems to make things easy.
Cheers!
Hello Ethan,
I am interested in your board; do you have any available?
If not; where could I get the code, in order to try setting it up on my own.
I look forward for your comments.
Thanks!
Remberto
Remberto,
This project has fallen by the wayside as I now use therm for most of my temperature-control needs. However, the source code is available for download, and the old hardware files are in the “archive” folder of the therm source code. Let me know if you have any questions!
Which Compiler did you use? I cannot compile the the source